
A traditional hearing aid is helpful for many children with mild or moderate hearing loss, but it’s not always enough for children with severe hearing loss. If a traditional aid is not giving your child the help they need, your child may be eligible for a cochlear implant.
Here’s what you need to know if your child will be receiving a cochlear implant.
Receiving a Cochlear Implant
Before your child gets their implant, read up on the basics — from how the implant works to what to expect on the day of the procedure to recovery after surgery.
-
How Cochlear Implants Work
A cochlear implant is different from a traditional hearing aid. A traditional aid picks up sound via a microphone. It then makes the sound louder and sends a signal — called an acoustic signal — through the auditory system.Cochlear implants use a different type of signal — an electric signal. This stimulates the hearing nerve and transports information to your child’s brain.
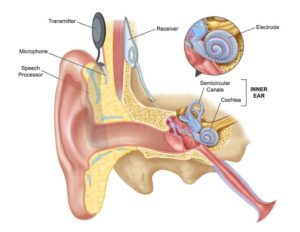
The implant consists of an external portion that rests behind your child’s ear and an internal portion that’s surgically placed under your child’s skin. Within these two portions, there are several parts that work in a step-by-step process to help your child hear:
- The microphone picks up sound.
- The speech processor analyzes and arranges the sound.
- The transmitter and receiver/stimulator takes signals from the speech processor and converts them into electrical signals.
- A group of electrodes takes the impulses and delivers them to different parts of the auditory nerve (the nerve that goes from the inner ear to the brain).
This process does not restore normal hearing. Instead, it gives your child’s brain the tools it needs to process and understand sound and speech.
-
Candidacy for a Cochlear Implant
Determining if a cochlear implant is right for your child is a team approach. You and your child will need to have several appointments with different team members.Initial Cochlear Implant Consultation
A Cochlear Implant Audiologist will discuss hearing loss, criteria for the implant, and benefits and risks.
Please bring all of your audiology and other related medical records to the appointment. Also, please have your child wear or bring any hearing aids they use. If your child does not currently wear, or has never worn, a hearing aid, the audiologist may recommend a hearing aid trial.
Audiological Evaluation
An audiologist will assess hearing aid benefit and determine if your child is a good candidate. This will include speech perception tests with words and sentences to evaluate their speech understanding without visual information. The audiologist also may decide to recheck your child’s hearing without their current hearing aid.
This appointment may be repeated if testing indicates poorly fit hearing aids or is not reliable. If your child does not already have hearing aids, they will be fit with them before this appointment.
Ear, Nose, and Throat (ENT) Evaluation
This appointment is to ensure that your child is healthy enough to undergo the cochlear implant surgery. The ENT provider will discuss the surgical procedure and risks, and will complete an examination of your child’s auditory system anatomy.
Imaging Appointment: (CT/MRI) ABR (if necessary)
The Computerized Tomography (CT) and Magnetic Resonance Imaging (MRI) appointment is to determine if the anatomy of your child’s inner ear and hearing nerve are appropriate for use of the cochlear implant. If your child needs a further hearing test to confirm the required hearing loss, this can be done while asleep for the imaging appointment (Auditory Brainstem Response Test). This hearing test will only be done if hearing status has not been confirmed prior to the imaging appointment.
Speech Evaluation
A speech-language pathologist will evaluate your child’s speech ability, while also establishing a baseline before the surgery. After the surgery, they will meet with your child regularly to make sure that the implant is giving them the best understanding of speech possible.
Balance Assessment
This appointment is with our vestibular audiologist in Lincoln at the Barkley Center at the University of Nebraska. The audiologist will evaluate your child’s balance to ensure that their balance system will not be harmed by the implant. If your child already has difficulty with balance, the audiologist may recommend physical therapy.
Social Work
Social workers are your family’s advocates. A social worker can connect you to resources to help you manage any stressors or barriers to your child’s success with the cochlear implant, and any tools you need to ease through the transition.
Behavioral Health
Meeting with a member of the behavioral health team is necessary to determine the motivation and willingness to do what is required to achieve optimal success when using a cochlear implant. They may use the assessment provided by the team social worker to address ways to cope with emotional stressors concerning the cochlear implant process.
Expectations/Device Selection
This is the final appointment at Children’s before your child gets scheduled for a cochlear implant. Your child’s Cochlear Implant Audiologist will discuss the risks and benefits in detail and help you set realistic expectations of what the implant is capable of providing.
You will then discuss the three different manufacturers of cochlear implants, including details about the warranty, accessories, and features.
-
What to Expect From a Cochlear Implant
The effectiveness of a cochlear implant varies from person to person. For example, the implant may help your child detect sounds at the most basic level, or it may give them the ability to identify what is being said without prior knowledge of what the word or sentence choices are in noise.The amount of benefit that your child receives depends largely on their past hearing history and exposure to amplification and spoken language.
A child who is post-lingually deaf (they began experiencing hearing loss after developing spoken language) may have a different outcome than a child who is pre-lingually deaf (they developed hearing loss before speaking).
Regardless of your child’s type of deafness, expect them to need auditory verbal and speech-language rehabilitation to improve their speech perception after receiving the cochlear implant.
-
Meningitis Vaccine Requirement
Meningitis is a very rare complication of cochlear implant surgery. However, since meningitis can be life-threatening, Children’s requires that all patients receive meningitis vaccinations before cochlear implant surgery. These vaccines should be completed at least 2 weeks prior to the surgery.Read more about vaccine recommendations from the Centers for Disease Control and Prevention (CDC).
-
The Day of Surgery
Cochlear implant surgery is an outpatient procedure, meaning your child can most likely go home on the same day.Here’s what happens during surgery:
- Before the procedure, your child will receive general anesthesia — a medication that keeps your child asleep during the procedure so they cannot feel or remember the surgery. They may also need a small amount of hair behind their ear shaven.
- The surgeon makes a small incision (cut) in the crease behind the ear. This makes the scar very difficult to see once it has healed.
- A pocket is created under the skin for the internal receiver-stimulator portion of the implant. This portion is flat, so it will not produce a noticeable bump or shape.
- An opening is made into the air-filled bone called the mastoid. This is called a mastoidectomy, and it allows the surgeon to access your child’s cochlea without disturbing the ear canal or eardrum.
- The surgeon will cut a very small opening into the cochlea, and thread in the implant electrode.
- The incision is closed with hidden absorbable stitches that do not require removal. A mastoid dressing is placed on your child’s ear. It will need to remain in place for 1 to 2 days.
Your child will probably be able to leave the hospital 2 to 3 hours after the surgery is completed.
Your child may experience some mild-to-moderate pain for 1 to 2 days, which can be controlled with oral pain medicines. They may also have imbalance for a few days, but this typically resolves on its own within the first week.
-
Recovering From Surgery
After surgery, your child should avoid sports and strenuous activities or exercise for 3 weeks. After that, there are no activity restrictions.Your child’s incision must remain dry for 3 days after the surgery. Once healed, there will be little to no visible evidence of the implant.
Two weeks after the surgery, your child will need to come back to their audiologist’s office to have the implant activated and receive the external equipment. The time in between the surgery and this appointment allows the incision site to heal and any swelling to go down.
-
Risks of Surgery
Cochlear implant surgery is generally a very safe procedure, but all surgeries do come with some risks.In rare cases, cochlear implant surgery can cause complications including:
- Loss of natural (or residual) hearing in the implanted ear
- Higher risk of meningitis — an infection around the brain and spinal cord
- Facial nerve stimulation, which can result in involuntary facial twitching
- Facial paralysis (drooping)
- Swelling, pushing, or thrusting out (extrusion) of the device
- Soreness, redness, or breakdown of the skin around the device
- Numbness or tenderness around the ear
- Taste changes, such as dry mouth or a metallic taste in the mouth
- Leak of inner ear fluid (perilymph) or fluid that surrounds the brain (cerebrospinal fluid)
- Dizziness or vertigo
- Ringing in the ears (tinnitus)
- Rashes
- Risks associated with general anesthesia, such as nausea or confusion after surgery
- Blood, fluid, or infection near the surgery site
- Post-surgery pain, scarring, bleeding, or infection
There’s also a possibility of implant failure, which can sometimes require re-implantation.
Activating the Cochlear Implant
One of the most exciting parts of the cochlear implant process is activation day. Two weeks after surgery, your child will return to their audiologist for their initial activation. This is when we program and turn on the implant for the first time.
At this visit, our main goal is sound detection and to begin providing your child’s auditory nerve and brain with new stimulation.
-
On Activation Day
During the appointment, your child will be fit with the external equipment, like the processor and magnets. We will then turn on the internal part of the implant and test how your child responds to sounds at different volumes. This information is used to create a program, or “map.” (At follow-up appointments, their processor will be reprogrammed or remapped to see if any changes need to be made).We will also discuss how to use, troubleshoot, and maintain the equipment.
We recommend that your child wears the cochlear implant as much as possible — preferably during all waking hours — after activation.
If your child uses a traditional hearing aid, they will most likely be able to wear both the aid and the implant together. However, we ask that they leave out the hearing aid for the appointment.
-
What to Expect After Activation
The sound from the cochlear implant may sound strange and unclear at first. Many patients describe sound as “robotic” or “cartoonish.” The quality of sound will improve over time and with practice.Most changes in hearing occur up to a year following the activation. However, it’s okay if it takes a little longer — everyone adapts to sound stimulation at a different rate.
-
Follow-Up Appointments
After receiving a cochlear implant, your child will need a series of follow-up appointments. Since the brain adapts to the implant most quickly within the first weeks to months, we recommend that appointments follow this schedule:- Activation (2 weeks post-surgery)
- 1-2 Weeks Post-Activation
- 1 Month Post-Activation
- 3 Months Post-Activation
- 6 Months Post-Activation
- 1 Year Post-Activation
- Annual Follow-up
Speech Therapy and Extra Help
Your child’s cochlear implant has been activated. Their audiologist has programmed the right settings. They’re beginning to listen to a brand new world of sound.
What happens next?
Active listening and practice with the cochlear implant have been shown to increase speech understanding. Research has shown that listening practice or exercises, known as aural rehabilitation or aural rehab, can increase the rate of progress.
Aural rehab includes exercises and programs designed to teach your child how to listen through their implant. Your child may work through these exercises with a professional, like a speech-language pathologist. They may be able to do aural rehab exercises on their own at home, through methods as simple as listening to audio books through the implant.
Aural Rehab Resources
Here are several programs and websites designed to help your child with aural rehab. Many of these sites have created self-guided listening exercises that allow you to move through programs at your own pace.
-
Free Online Resources for Aural Rehab
-
Additional Online Resources
Technical Support
Here’s where to go for troubleshooting, whether you have technical questions, want to purchase new parts, or need information about insurance and reimbursement.
-
Manufacturer Technical Support
Advanced Bionics
-
Customer Service
- Phone: (877) 829-0026
- Email: [email protected]
-
Advanced Bionics Store
- Purchase of items or parts can be made directly through the AB store.
- my AB Online
Cochlear Corporation
-
Customer Service
- Phone: (800) 483-3123
- Email: [email protected]
- myCochlear (offers online self-service support)
-
Cochlear Store
- Purchase of items or parts can be made directly through the store.
-
Reimbursement & Insurance
- Phone: (800) 633-4667
MED-EL
-
Customer Service
- Phone: (888) 633-3524
- Email: [email protected] or [email protected]
-
myMED-EL WebShop
- Purchase of items or parts can be made directly through the WebShop
-
Customer Service